
Computers are the most awful way to do things, except for all the other ways we’ve tried. It’s easy to blame computers; they don’t fight back. What’s much more difficult, yet distressingly important, is figuring out why computers have done something unappreciated and remedying the situation. One important tool in a systems administrator’s arsenal is Solarwinds’ Virtualization Manager. Humans have a natural tendency to anthropomorphize inanimate objects. Many of us give our cars names, ascribe to them personalities, talk to them and sometimes treat them like members of the family. We similarly ascribe personalities and motivations to individual computers or even entire networks of them, often despite being perfectly aware of the irrationality of this. We can’t help it: anthropomorphizing is part of being human. Computers, however, aren’t human. They don’t have motives and they don’t act without input. They do exactly they are told, and that’s usually the problem. The people telling the computers what to do – be they end users or systems administrators – are fallible. The weakest link is always that which exists between keyboard and chair. Our likelihood of making an error increases the more stress we’re put under. Whether due to unreasonable demand, impossible deadlines, or networks which have simply grown too large to keep all the moving parts in our memory at given time, we fallible humans need the right tools to do the job well. You wouldn’t ask a builder to build you a home using slivers of metal and a rock to hammer them. So why is it that we so frequently expect systems administrators to maintain increasingly complex networks with the digital equivalent of two rocks to bash together? It’s a terrible prejudice that leads many organizations to digital ruin. A tragedy that, in...

Intro to PowerShell 3 – The PowerShell ISE
posted by Aaron Milne
In the first two parts of this series (part 1; part 2) we covered the PowerShell CLI and the associated scripting language, and we also covered Cmdlets and discovered how they’re the fundamental building blocks of the PowerShell world. In this part we will be discussing the PowerShell ISE and what it can do for you. Introducing the .ps1 file format. In Part 2 of this series we ran 3 commands in the CLI to validate a directory path, create a non-existent directory and then pipe the output of the DIR command to a text file. We did all of this from the CLI because that’s how you manually enter commands for PowerShell to run. This is a bit clunky though. If we had to open the CLI every time we wanted to run commands in PowerShell its usefulness and indeed its real world applications would be limited at best. Much like the CMD prompt had batch scripts, PowerShell has its own scripting file format that allows us to write scripts and run them all at once or even as part of an automated procedure. Enter the .ps1 file. A .ps1 file is essentially the next step in the evolution of the .bat file. Like batch files, a .ps1 file is a plain text file that the PowerShell interpreter steps through line by line, running the individual commands sequentially and combining the output as necessary. For example, if we were to combine the three commands from the exercise in Part 2 into a .ps1 file (for the sake of this example we’ll call it ITPS_B3_Example1.ps1) we would start off with something that looks like this: Test-Path C:\Utils New-Item C:\Utils -ItemType directory dir | Out-File C:\Utils\dir.txt Running a script from windows explorer is as easy...
Intro to PowerShell 2 – Cmdlets
posted by Aaron Milne
In part 1 of this series we were introduced to the PowerShell CLI and ran the Get-Help command. In this part we will introduce you to Cmdlets. Introducing Cmdlets Cmdlets (pronounced command-lets) are specialised commands used in the PowerShell environment to call specific functions. To put this another way, Cmdlets are simple ways of calling and executing the pre-built commands in PowerShell. PowerShell Cmdlets are easily identifiable because they use binomial nomenclature – ie there are always 2 parts to the name and both parts are separated by a hyphen. For example: The Get-Help command that we used in Part 1 is actually a Cmdlet. In part 1 of this series I mentioned that we could pipe the output of the legacy dos command DIR to a file with a single line entered into the PowerShell CLI. To do this we would enter the following text in the PowerShell CLI: dir | Out-File C:\Utils\dir.txt In plain English this says “Take the output of the dir command and give it to the Cmdlet Out-File to be written to the file dir.txt in the C:\Utils\ path. Pretty powerful stuff for a command that is only 31 characters long. You might have noticed that there is a character in that command that you might not be familiar with. It’s the | character and on most US style keyboards it’s located on the same key as the \ key. The | character is what we refer to as the pipe operator. It tells PowerShell to take the output of what comes before and hand it off to what comes next. For more information on the | operator and the fun you can have with it, take a look at the activity below. Cmdlets then are the building blocks...

Intro to PowerShell 1 – The PowerShell CLI
posted by Aaron Milne
Author’s Note: This is the first installment of a three-part Introduction to PowerShell tutorial. This is guide is not intended to be an exhaustive treatise on PowerShell. If that is what you’re after, search PowerShell on Amazon. This is intended to be used simply as an introduction by those who are new to Microsoft’s scripting and automation language of choice. I’m a big fan of interactivity. If you’d like to play along with and become familiar with the various parts of PowerShell environment as we cover them I strongly encourage you to do this. You may already have PowerShell installed on the machine you’re using. If you don’t, you can get it from here. Introduction Unless you’ve been living under a rock, or are just starting out with Server Administration, then chances are fairly good that you’ve at least heard of PowerShell. Introduced in 2006 and currently on version 4*, Windows PowerShell is a task automation and configuration management framework from Microsoft built on the .NET Framework. The complete PowerShell environment consists of: A CLI and associated scripting language, Cmdlets (pronounced command-lets), The ISE. First cab off the rank is the a quick and dirty introduction to the PowerShell CLI. The PowerShell CLI First a little background. If you open your start menu and type cmd in the search and press enter you’ll be presented with the classic windows command line interface or CLI. This CLI, although quite powerful within certain narrow boundaries, is extremely limited when it comes to providing a scripted management interface. You can of course run batch files and accomplish a level of automation using this command line, but it is still quite limited. Nearly a decade before PowerShell was released it became apparent to Microsoft that Windows needed a way...

KMS and MAK Licensing
posted by Adam Fowler
Microsoft licensing is one of the things that puts fear into most people who have dipped their toes into it. Understanding how to be compliant with Microsoft – and how to make sure the company’s money is being spent properly – can be daunting. From an admin’s side, this is often not a concern as it’s not a part of their job – but at least understanding the implications of installing 10 different SQL servers in the environment is a necessity. One of the more fundamental models Microsoft now uses with Windows Server, Windows Client (e.g. Windows 7) and Office is using a key to register the products. So, how do you do it if you’re on a Volume Licensing Agreement? What are KMS and MAKs? With a Volume License Agreement with Microsoft, you are normally given two types of keys: Multiple Activation Key (MAK) and Key Management Services (KMS). The MAK will normally have an activation count, while the KMS does not. Simply put, MAK is a key that registers direct back to Microsoft with a certain amount of allowed activations. KMS on the other hand, lets all your clients use a generic key to talk back to a KMS Server on premise, and that centralised server talks back to Microsoft. The MAK side of things is pretty straight forward: you put a different key in per client, it will phone home and then either activate or fail. This works, but isn’t the way you should do things in a large environment. KMS gives you that automation. KMS sounds great, how do I set that up? I’ve written about this before on How To Enable Office 2013 KMS Host and How to add your KMS keys for Windows 8 and Server 2012, so I’ll just clarify how the...

Coping with infinite email
posted by Adam Fowler
Exchange 2010 and 2013 have an option called “Retention Policies”. I’ll base the below on what I see for Exchange 2010, but most of not all should apply to 2013 also. Retention Policies are useful if you need to keep your user’s mailboxes clean, as well as trying to avoid a Deleted Items folder with every single email the employee has received in their time with the company. You can work out what the company agrees with for what can and can’t be auto deleted, and save a lot of money on space for both live information and backups. The Retention Policies are made up of “Retention Policy Tags” and these tags “control the lifespan of messages in the mailbox” as quoted by one of the wizards that you configure this in mailbox. The Retention Policy is then targeted at the mailboxes you want to apply these settings to. Maybe not this wizard. It’s worth noting that a mailbox can only have one Retention Policy linked to it, so you need to plan overlapping settings accordingly. So, what can a Retention Policy Tag do? You give it a ‘Tag Type’ which is either a folder in someone’s mailbox (e.g. Deleted Items) or every other folder that isn’t an inbuilt folder. From that definition of what folder the tag is on, you can either set an age limit for all items in that folder, or set the items to never age. The Age limit is a number in days. This number actually means something different depending what Tag Type was targeted. For an email in the Deleted Items folder, it’s based on the date the item was deleted by stamping it at the time of deletion. There’s some caveats around that, so refer to this chart on TechNet which lays out...
Practical Group Policy
posted by Adam Fowler
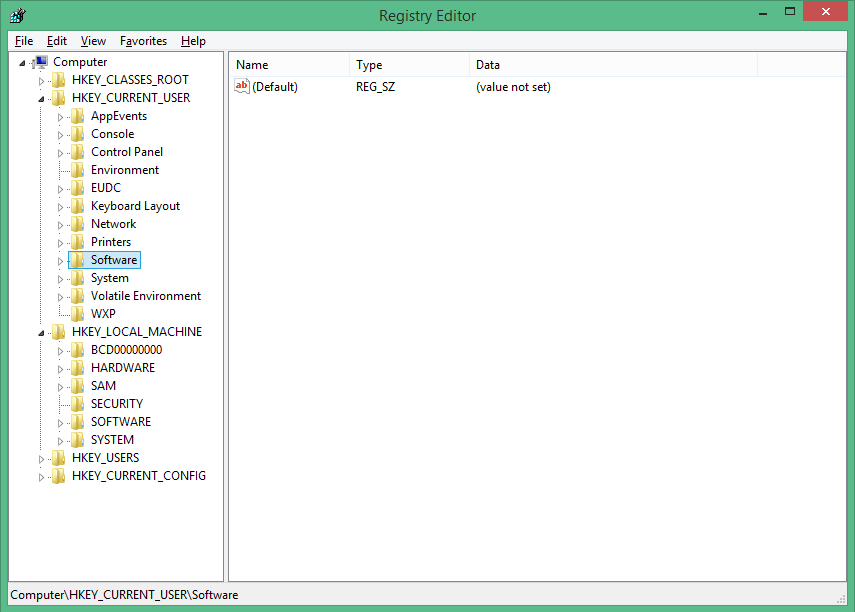
Normally when you think of Windows Registry, you’re normally worried about the two sections: HKEY_LOCAL_MACHINE (HKLM) and HKEY_CURRENT_USER (HKCU). It’s fairly obvious that settings under each area apply to either the PC itself (machine) or just to the currently logged in user. This is usually fine, but there are scenarios where there’s a setting that will only apply to a machine due to how the program is written, but you actually want to turn it on or off based on the logged on user. With Group Policy Preferences (GPP) which was introduced with Windows Server 2008, this is much easier to do. Before this, you would have need to have written complex logon scripts using 3rd party tools to perform lookup commands, create variables and then adjust the registry accordingly, while providing administrator credentials. GPP lets you apply registry settings rather easily. One of the main benefits of GPP is how flexible and granular you can be with the settings you apply. This is how I would normally use to deploy a setting, but have it easily managable: Have two settings for the registry, one setting it on and the other off (normally done by a 1 for on, 0 for off but it depends on the setting). The targeting for having the setting on or off is based by user membership to an Active Directory (AD) group, but the setting is not applied in the user context meaning it’s applied by ‘System’ which will have full access to the HKLM registry. This will then mean the HKLM setting changes from 0 to 1 and back based on which user logs in! I prefer this than just applying particular users individually to the item because it will reduce processing time having a single check...
Getting AD User Data via PowerShell
posted by Adam Fowler
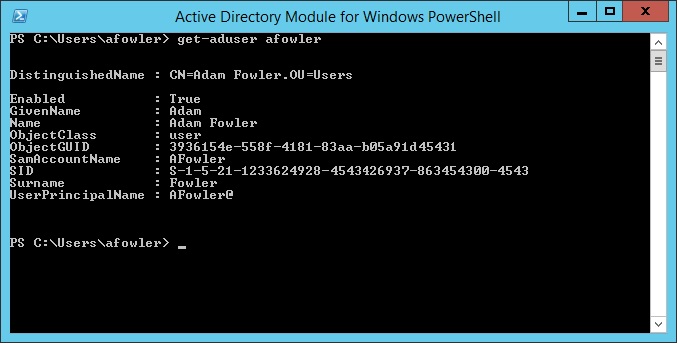
It’s a common question asked of IT – “Can you give me a list of who’s in Marketing?” or “How many accounts do we actually have?” Before PowerShell, this was a lot harder to do. There were companies like Quest Software who provided several handy tools (and still do) , or long complicated visual basic scripts. So, how do you get a list of users? All of this is being done from the Active Directory Module for Windows PowerShell which will install as part of the Windows Server 2012 Feature – Role Administration Tools > AD DS and AD LDS Tools > Active Directory Module for Windows PowerShell. The ‘Get-ADUser’ command is what we’ll use to demonstrate what you can do. For starters, ‘Get-ADUser -filter*’ will get you a list of all users, and they’ll output in this format one after the other: A lot of information. You can specify a single user with: Get-ADUser -identity username which will just show you the one result. As you may be aware, there are a lot more fields a user has than just the ones shown. You can tell PowerShell to show you all the properties by modifying the command like this: Get-ADUser -identity username -properties * Note that in PowerShell v4 if you get the error “get-aduser : One or more properties are invalid.” then there may be an issue with your schema. Check out this post for more information. If there’s just one extra property you need, there’s no point getting everything, so if you needed to see a field such as “Department” for all users then adjust the command like this: Get-ADUser -filter * -properties Department Now, this gives the results for every single user in your Active Directory environment. You can narrow this down to a particular...

Diverting Unassigned Numbers in Lync 2010
posted by Adam Fowler
Lync 2010 with Enterprise Voice attaches a phone number to a user with a direct one to one relationship. This means that when a user departs, the account should get disabled along with any Lync attachments. In turn, this abandons the phone number that was attached to the user. All great by design, but what about external people that are still calling the number of the departed user? You could leave the user’s Active Directory account disabled, leave Lync attached and configure it that way, but that’s a big hassle. Microsoft covers this scenario with a feature called “Unassigned Number”. Unassigned Number lets you configure an Announcement on an entire number range. The idea is that if any extension in the number range configured (which can be a single number) is called and isn’t attached to a user, it will divert the call to either an Announcement or an Exchange UM Auto Attendant number. Generally just the Announcement is fine, because the Announcement can be configured to be nothing, but divert the call to wherever you want it to go afterwards. The Announcement needs to be configured before you create an Unassigned Number Range, which can only be managed by PowerShell. The Unassigned Number Range can be created via the Lync Control Panel GUI or PowerShell which seems a bit inconsistent. Creating an Announcement is rather easy still, with a great guide from TechNet here. The important bits are to give your Announcement a name, tell it which Lync Pool to use and give it a target SIP address to send the call to. An example command do this is: New-CsAnnouncement -Identity ApplicationServer:lyncpool.mydomain.com -Name "Forward Announcement" -TargetUri sip:reception@mydomain.com Note that if you use a direct phone number for the sip address, you need to append...

How to opt out of Shared Endorsements
posted by Katherine Gorham
How do you feel about having your mom find out that you gave “Kinky Drinking Games: Spring break edition” a four star review? Or about sharing your positive experience of hemorrhoid ointment with that client you’re trying to impress? What if your strongly pro-life supervisor at work sees your face in an ad for “Everything You Need to Know to Prepare for an Abortion?” Not keen? Google recently updated their Terms of Service to include something called Shared Endorsements, which will go live on November 11. If you have a Google Plus account, Shared Endorsements allow Google to use your name, image, and activity on Google sites to advertise to your family and friends. Google Plus users under eighteen years of age are automatically excluded from Shared Endorsements, but adults need to change their account settings if they don’t want their information used in ads. If you would like to opt out, here’s how: 1) Sign in to your Google Plus account 2) From the “Home” drop-down menu in the top left corner, choose “Settings.” 3) Check to see if Shared Endorsements are on or off. If they are on, click “Edit.” 4) The Shared Endorsements page is long and the actual opt-out is below the fold. Scroll down. You’re looking for this: 5) Make sure the tick box is un-checked, then hit “Save.” 6) A warning message will pop up; hit “Continue.” You’ve opted out. Go plus-one “Rabid Zombie Ferret Fanciers” in (relative)...
Internet: Do you speak it?
posted by Trevor Pott
Get searchable, get on Facebook – or lose your customers This article was first published by The Register on February 24, 2012. The original can be found here. Today I wanted to buy a metal business card case I could carry around in my pocket. I asked Google Maps politely if it knew where in Edmonton I could find such a widget, preferably on the way home. Google didn’t have the faintest clue where I could get such a thing, no matter how delicately I phrased the request. I eventually switched to Google proper, asked Bing and even tried twitter. I only ever really came up with three viable results, all of which were at least 15 km in the wrong direction, and I had no intention of wasting two hours (and $20 of gas) trekking across the bridge in rush hour to pick up a few $10 cases. In a city of one million people, less than a handful of companies spoke enough internet to have relevant search results on Google, and none of them have figured out how to integrate with Google Maps. Local businesses desperately need a lesson in Internet Presence Management (IPM). IPM encompasses the totality of a company (or individual’s) online presence. Far more than simple Search Engine Optimization (SEO), it covers the existence (or lack thereof) of an online catalogue of goods and services, social media usage, and various flavours of astroturfing. While it is traditional for IT types to deride and disparage all aspects of IPM, it has become absolutely essential to the survival of the modern business. Gaming Google isn’t enough; its influence is all too often overstated. IT types like to make jokes about people who believe that the internet is a little blue “e”,...