
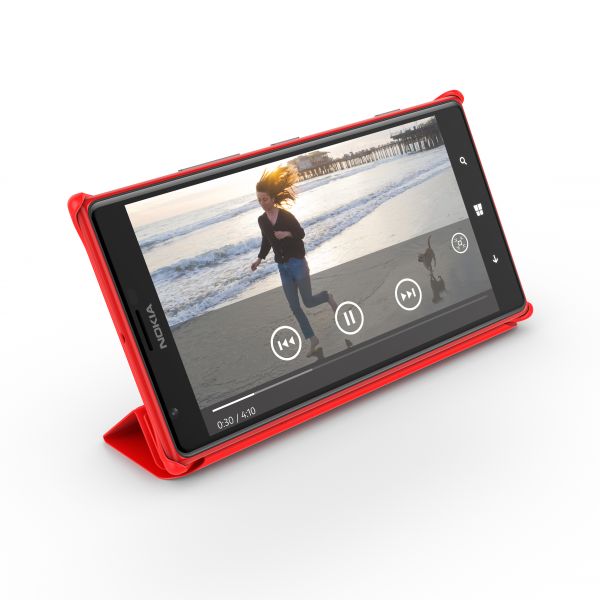
Microsoft have provided me with a new Nokia Lumia 830 to roadtest, so I was keen to compare it against the current flagship model – the Nokia Lumia 930. The 830 is a mid-range phone though, so there are many differences between the two. I reviewed the Lumia 930 a few months ago, so we’ll cover the 830 mostly with some comparisons to the 930. OS The Lumia 830 is one the first phones to ship with Lumia Demin, following on from the Lumia Cyan release (they go up alphabetically, like Ubuntu releases). Microsoft list the features here, and there’s a few nice additions. For Australians such as myself, along with Canadians and Indians, we have alpha Cortana support. I’ve started to test this, and speech recognition is definitely better than it was previously. The other more important benefits relate to certain Lumia phones only, which mostly focus on camera improvements, as well as features for the glance screen. Screen Yes, the glance screen is back! This was one of the biggest features missing from the Lumia 930, but due to the 830 using an LCD screen rather than the 930’s OLED. Grabbing your phone out your pocket and just looking at it to know the date/time along with a second piece of information is simple but efficient. I’d like to see more options around this – I don’t like choosing between weather OR my next meeting, I’d like to see both. Hopefully as glance screen matures, it will become even more customisable. Despite both phones having a 5 inch screen, resolution wise, the 830 runs at 720 x 1280, which is much lower than the 930’s 1080 x 1920. I couldn’t visibly tell the difference in general day to day use, so although more...
Intro to PowerShell 2 – Cmdlets
posted by Aaron Milne
In part 1 of this series we were introduced to the PowerShell CLI and ran the Get-Help command. In this part we will introduce you to Cmdlets. Introducing Cmdlets Cmdlets (pronounced command-lets) are specialised commands used in the PowerShell environment to call specific functions. To put this another way, Cmdlets are simple ways of calling and executing the pre-built commands in PowerShell. PowerShell Cmdlets are easily identifiable because they use binomial nomenclature – ie there are always 2 parts to the name and both parts are separated by a hyphen. For example: The Get-Help command that we used in Part 1 is actually a Cmdlet. In part 1 of this series I mentioned that we could pipe the output of the legacy dos command DIR to a file with a single line entered into the PowerShell CLI. To do this we would enter the following text in the PowerShell CLI: dir | Out-File C:\Utils\dir.txt In plain English this says “Take the output of the dir command and give it to the Cmdlet Out-File to be written to the file dir.txt in the C:\Utils\ path. Pretty powerful stuff for a command that is only 31 characters long. You might have noticed that there is a character in that command that you might not be familiar with. It’s the | character and on most US style keyboards it’s located on the same key as the \ key. The | character is what we refer to as the pipe operator. It tells PowerShell to take the output of what comes before and hand it off to what comes next. For more information on the | operator and the fun you can have with it, take a look at the activity below. Cmdlets then are the building blocks...

Intro to PowerShell 1 – The PowerShell CLI
posted by Aaron Milne
Author’s Note: This is the first installment of a three-part Introduction to PowerShell tutorial. This is guide is not intended to be an exhaustive treatise on PowerShell. If that is what you’re after, search PowerShell on Amazon. This is intended to be used simply as an introduction by those who are new to Microsoft’s scripting and automation language of choice. I’m a big fan of interactivity. If you’d like to play along with and become familiar with the various parts of PowerShell environment as we cover them I strongly encourage you to do this. You may already have PowerShell installed on the machine you’re using. If you don’t, you can get it from here. Introduction Unless you’ve been living under a rock, or are just starting out with Server Administration, then chances are fairly good that you’ve at least heard of PowerShell. Introduced in 2006 and currently on version 4*, Windows PowerShell is a task automation and configuration management framework from Microsoft built on the .NET Framework. The complete PowerShell environment consists of: A CLI and associated scripting language, Cmdlets (pronounced command-lets), The ISE. First cab off the rank is the a quick and dirty introduction to the PowerShell CLI. The PowerShell CLI First a little background. If you open your start menu and type cmd in the search and press enter you’ll be presented with the classic windows command line interface or CLI. This CLI, although quite powerful within certain narrow boundaries, is extremely limited when it comes to providing a scripted management interface. You can of course run batch files and accomplish a level of automation using this command line, but it is still quite limited. Nearly a decade before PowerShell was released it became apparent to Microsoft that Windows needed a way...

How To Change IE10’s Default Search Engine
posted by Adam Fowler
Originally posted on adamfowlerit.com Automating the change of Internet Explorer 10’s default search engine from Bing to Google shouldn’t be a difficult task, but it is. I’ll first cover what we’re trying to automate, then the possible options on how to do it. I found a lot of misinformation online when doing this too which was surprising, I’ll add notes in around what I found on that too. Brief instructions are down the bottom if you just want to know what to do! To do this manually on an individual PC, you need to do two things. Install the Search Provider addon, and then set it as the default. The first part can be done by going to the iegallery website and finding an Add-on, for Google Search you can go here: http://www.iegallery.com/en-us/Addons/Details/813 and click the big ‘Add to Internet Explorer’ button. Setting it as the default is possible from the popup when clicking the button, or going into your Add-ons and ticking the right search engine as your default. Google provides some very basic instructions here https://support.google.com/websearch/answer/464?hl=en which are: Internet Explorer 10 Click the Gear icon in the top right corner of the browser window. Select Manage add-ons. Select Search Providers. In the bottom left corner of your screen, click Find more search providers. Select Google. Click the Add to Internet Explorer button. When the window appears, check the box next to Make this my default search provider. Click Add. So far this is incredibly simple! If you were starting from scratch, you can package up IE10 using the Internet Explorer Administration Kit (IEAK) and add in extra search engines as well as specify the default. There’s a good guide at 4syops here http://4sysops.com/archives/internet-explorer-10-administration-part-4-ieak-10/ which covers this, but doesn’t help you if PCs already have IE10, or will get it via other means (e.g....
Troubleshooting NIC Drivers in WinPE for SCCM 2012
posted by Adam Fowler
Originally posted at adamfowlerit.com This is one of the problems that every SCCM (System Center Configuration Manager) admin will come across. You’re trying to deploy an image to a PC from PXE booting, and you can’t get the list of task sequences to show up. The PC will reboot, and you’ll wonder what happened. There’s several different ways to troubleshoot this, but it’s most likely network card drivers required in your Boot Image in SCCM. Where do you start on this though? There’s a couple of things to enable/set to make it a little easier. First, enable command support on both your x86 and x64 boot images (Software Library > Overview > Operating Systems > Boot Images). This will allow you to press F8 when running WinPE from a task sequence, which brings up a command prompt to let you check things like log files. The other setting I recommend is making custom Windows PE backgrounds (same screen as the command support option). Have one for your 32 bit Boot Image, and a different one for your 64 bit. This means when something fails, you can tell at a glance which boot image was used and troubleshooting accordingly. Back to working out your NIC issue. If the task sequence is bombing out early on, press F8 to get your command prompt, then use the command ‘ipconfig’ If you see hardly any information, including the lack of an IP address then it’s a strong indicator that the correct NIC driver isn’t loaded. I’m going to guess you’ve checked the network cable is plugged in 🙂 To work out what NIC driver is required can be tricky. If your hardware came with an OS already loaded, or a recovery disk, you can load that up and from...
Practical Group Policy
posted by Adam Fowler
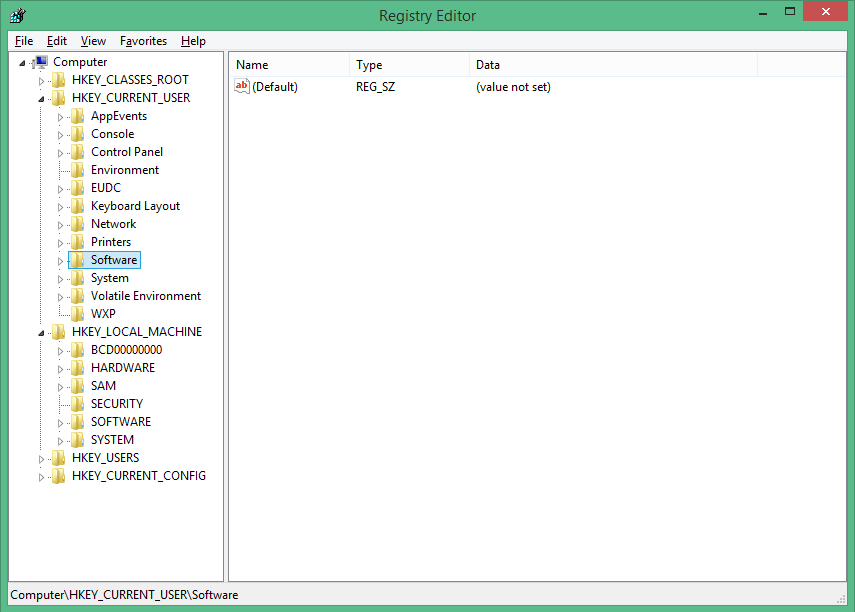
Normally when you think of Windows Registry, you’re normally worried about the two sections: HKEY_LOCAL_MACHINE (HKLM) and HKEY_CURRENT_USER (HKCU). It’s fairly obvious that settings under each area apply to either the PC itself (machine) or just to the currently logged in user. This is usually fine, but there are scenarios where there’s a setting that will only apply to a machine due to how the program is written, but you actually want to turn it on or off based on the logged on user. With Group Policy Preferences (GPP) which was introduced with Windows Server 2008, this is much easier to do. Before this, you would have need to have written complex logon scripts using 3rd party tools to perform lookup commands, create variables and then adjust the registry accordingly, while providing administrator credentials. GPP lets you apply registry settings rather easily. One of the main benefits of GPP is how flexible and granular you can be with the settings you apply. This is how I would normally use to deploy a setting, but have it easily managable: Have two settings for the registry, one setting it on and the other off (normally done by a 1 for on, 0 for off but it depends on the setting). The targeting for having the setting on or off is based by user membership to an Active Directory (AD) group, but the setting is not applied in the user context meaning it’s applied by ‘System’ which will have full access to the HKLM registry. This will then mean the HKLM setting changes from 0 to 1 and back based on which user logs in! I prefer this than just applying particular users individually to the item because it will reduce processing time having a single check...
Getting AD User Data via PowerShell
posted by Adam Fowler
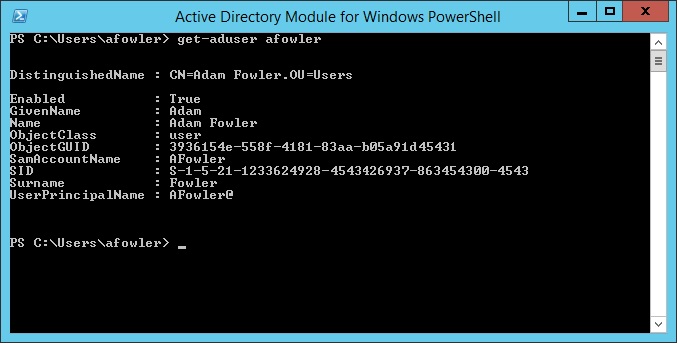
It’s a common question asked of IT – “Can you give me a list of who’s in Marketing?” or “How many accounts do we actually have?” Before PowerShell, this was a lot harder to do. There were companies like Quest Software who provided several handy tools (and still do) , or long complicated visual basic scripts. So, how do you get a list of users? All of this is being done from the Active Directory Module for Windows PowerShell which will install as part of the Windows Server 2012 Feature – Role Administration Tools > AD DS and AD LDS Tools > Active Directory Module for Windows PowerShell. The ‘Get-ADUser’ command is what we’ll use to demonstrate what you can do. For starters, ‘Get-ADUser -filter*’ will get you a list of all users, and they’ll output in this format one after the other: A lot of information. You can specify a single user with: Get-ADUser -identity username which will just show you the one result. As you may be aware, there are a lot more fields a user has than just the ones shown. You can tell PowerShell to show you all the properties by modifying the command like this: Get-ADUser -identity username -properties * Note that in PowerShell v4 if you get the error “get-aduser : One or more properties are invalid.” then there may be an issue with your schema. Check out this post for more information. If there’s just one extra property you need, there’s no point getting everything, so if you needed to see a field such as “Department” for all users then adjust the command like this: Get-ADUser -filter * -properties Department Now, this gives the results for every single user in your Active Directory environment. You can narrow this down to a particular...
Nokia Lumia 1520
posted by Adam Fowler
On the 11th December 2013, Nokia released its latest Windows Phone in the Lumia range – the 1520. Following up from the Lumia 1020 with its flagship 41 megapixel camera, Nokia went for a different extreme on the 1520 with a 6 inch display. Other impressive specifications include a full HD 1920 x 1080 resolution on the giant display, a 20 megapixel camera (which is still better than most other smartphones on the market), a quad-core processor, and finally a 3400mAh battery. That beefy battery is supposed to provide 32 days standby time, and my heavier real-world use averaged 2 to 3 days between charges. Software-wise, this is the first phone to run Nokia’s “Black” update which will end up being available to all Lumias, so that’s no reason to consider this particular phone. The hardware is what makes it or breaks it, so that’s what this review will focus on. Good Weight wise, it’s not a light phone at 209g. It is much heavier than an iPhone 5S at 115g or a Samsung Galaxy Note 3 at 168g, but I don’t consider it too heavy. The screen is the number one reason I’d recommend this phone. The amount of real estate you get will make you reconsider using a laptop to do lighter tasks, and the large number of tiles you can fit on a single screen means you can glance at your phone and see everything you need to know. The long battery life means that you’re much less worried about charging your phone at every chance you get, which is a refreshing change from most other smartphones. Bad There is only one official case for the 1520, and that’s the CP-623. It’s the standard ‘clip on the corners’ cover that most other...