


Intro to PowerShell 3 – The PowerShell ISE
This is the bit that changes everything
In the first two parts of this series (part 1; part 2) we covered the PowerShell CLI and the associated scripting language, and we also covered Cmdlets and discovered how they’re the fundamental building blocks of the PowerShell world.
In this part we will be discussing the PowerShell ISE and what it can do for you.
Introducing the .ps1 file format.
In Part 2 of this series we ran 3 commands in the CLI to validate a directory path, create a non-existent directory and then pipe the output of the DIR command to a text file. We did all of this from the CLI because that’s how you manually enter commands for PowerShell to run.
This is a bit clunky though. If we had to open the CLI every time we wanted to run commands in PowerShell its usefulness and indeed its real world applications would be limited at best. Much like the CMD prompt had batch scripts, PowerShell has its own scripting file format that allows us to write scripts and run them all at once or even as part of an automated procedure.
Enter the .ps1 file. A .ps1 file is essentially the next step in the evolution of the .bat file. Like batch files, a .ps1 file is a plain text file that the PowerShell interpreter steps through line by line, running the individual commands sequentially and combining the output as necessary.
For example, if we were to combine the three commands from the exercise in Part 2 into a .ps1 file (for the sake of this example we’ll call it ITPS_B3_Example1.ps1) we would start off with something that looks like this:
Test-Path C:\Utils
New-Item C:\Utils -ItemType directory
dir | Out-File C:\Utils\dir.txt
Running a script from windows explorer is as easy as navigating to the directory the file is saved in, right clicking on it and selecting run with PowerShell. Doing this though doesn’t quite produce results that we are expecting.
In part 2 when these commands were run manually they gave us the output of C:\Windows\System32. This is because that’s the default directory that the CLI opens in administrator mode. When you run the .ps1 file from explorer, the folder it opens into is by default the folder containing the .ps1 file.
There’s also something else that happened that you probably didn’t quite manage to catch – there was an error displayed in the PowerShell windows that was briefly displayed on screen. This error could be quite important so how do we find out what it is? I’m glad you asked.
Scripting with the PowerShell ISE
The PowerShell ISE is the interface Microsoft provides to make the various aspects of script creation as simple as possible. Unless you’re familiar with another solution (such as NotePad++) then the ISE is by far the best option for writing and performing step by step validation of your scripts.
When you first open the ISE you’re presented with the traditional CLI pane front and centre with a pane on the right hand side containing a tab in it called commands. Not exactly an incredibly useful sight. Pressing ctrl+R however will open up the script pane and we can really start getting to grips with what the ISE can do for us.
Opening our script is as simple as dragging and dropping into the ISE or alternatively you can use the more traditional File -> Open process. Once the script is open we can see that it looks like the figure below.
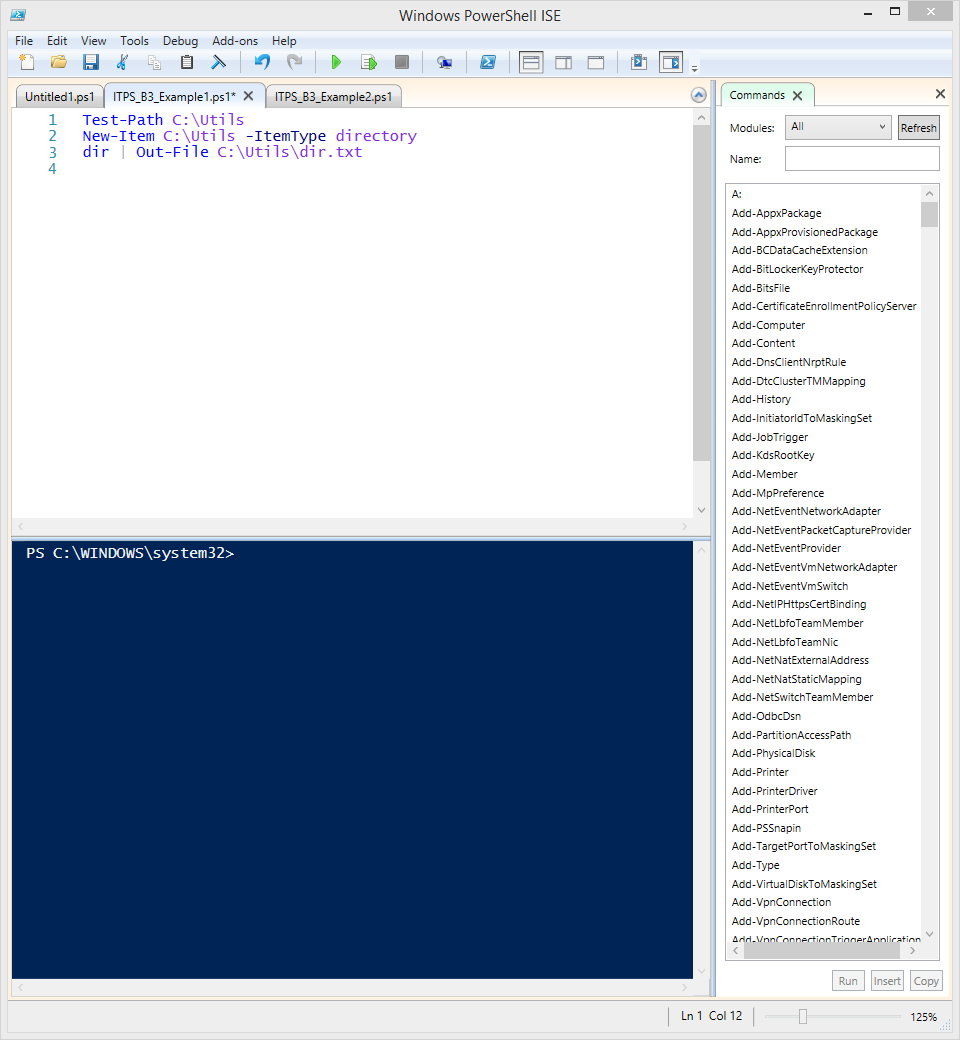
Like most scripting or development tools, the PowerShell ISE uses colors to allow you to more easily differentiate between different parts of your scripts. The default colour scheme displays Cmdlets and Commands in royal blue, arguments in magenta and parameters in dark blue.
The next part of the ISE that we’re interested in is using it to test run the script so we can see the message we missed in the CLI earlier and we do this through the Debug Menu. The Debug Menu runs your script for real, but rather than launching it in a new PowerShell CLI window, launches it in the CLI pane built into the ISE.
Select Run/Continue from the Debug menu and you are presented with a message in the CLI pane that looks like this:
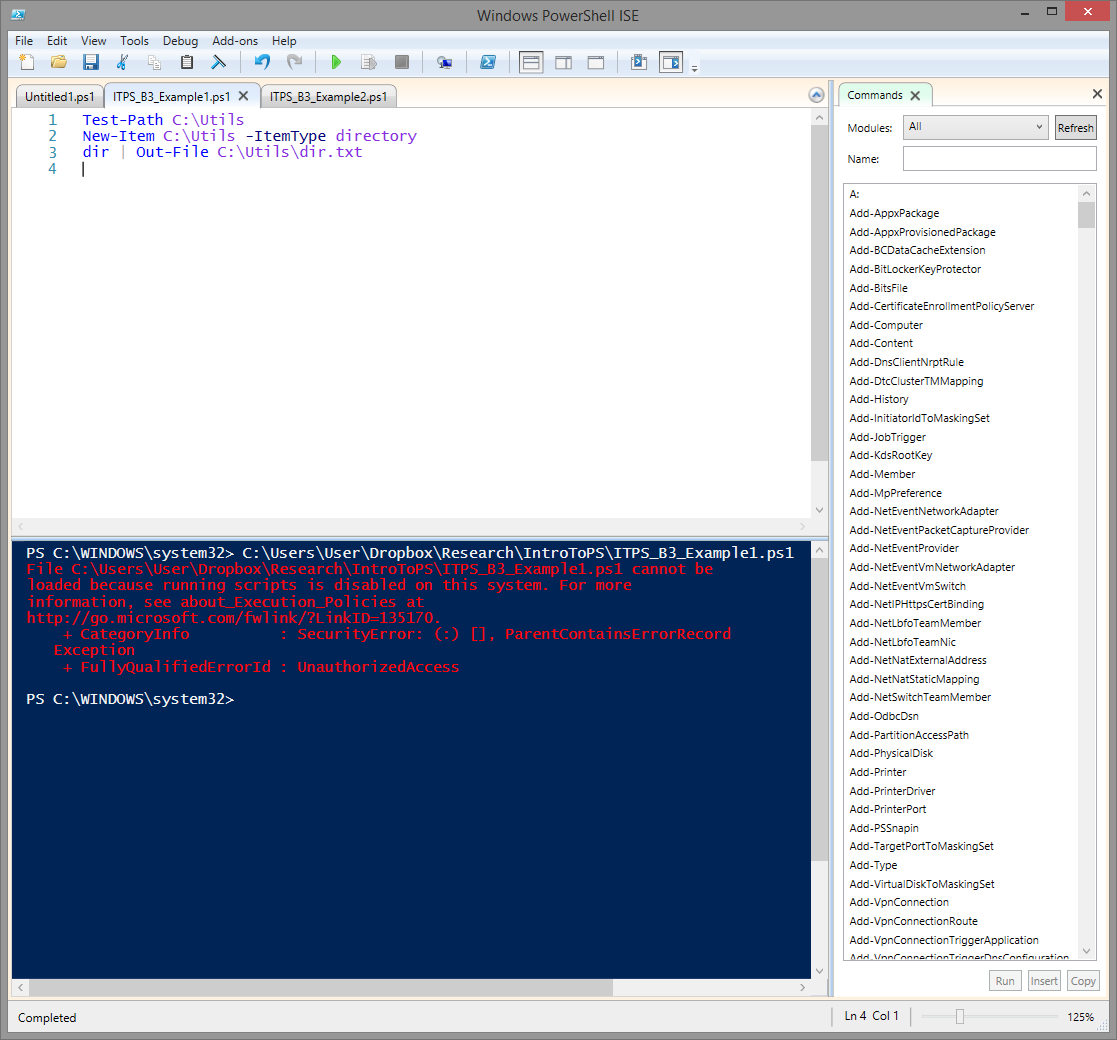
This is the first and most common error message you’ll encounter when trying to run a script. PowerShell is integrated deeply with various parts of Windows Desktop and Server and a malicious script could potentially damage your system. To enable you to run scripts though you have to disable this feature. To do that type the following command:
Set-Execution Unrestricted
Once you’ve done that, run the script again and you’ll be presented with another error message. This error message tells us that part of the script we are trying to run has failed because the C:\Utils directory we are attempting to create in line 2 already exists. Solving the remaining 2 problem is the subject of today’s activity.
Activity: Fixing the remaining issues with our first script
PowerShell as a scripting language is a wonderfully flexible thing. There are, for example, 4 different ways to create a folder. The best part is that none of these ways are wrong, even though one of them is a legacy command carried over from the Command Prompt. For this reason going forward, while we will provide a solution to the problem presented, it should be understood that this might not be the only possible solution. Right. Now that we’ve got that out of the way, let’s get to it.
Problem: Take the script that we were using earlier and fix the remaining issues.
When we are finished fixing this script it will need to be able to do two things:
- Validate the directory path. If the path does not exist it should create it and then pipe the output of the DIR command to the specified file. If the path does exist it should only pipe the output of the DIR command to the specified file.
- Specify a directory for the DIR command to pipe.
The easiest way to solve the issues with this script are by doing three things.
First initialize a Variable. In PowerShell a variable always starts with the $ sign. For this exercise we will use the variable $A. You could theoretically use any variable name you liked though there are some words that are off-limits. To initialize our variable we do the following:
$A = Test-Path C:\Utils
This tells PowerShell that we want the value of $A to be the result of Test-Path C:\Utils. We know from doing it manually in the last tutorial that Test-Path returns False if the path is invalid and true if the path is valid so the value of $A will either be True or False.
The second step is to create a simple “if, then, else” loop. This is a great way to proceed when we want our script to have the option to do multiple things based on the data available to it. This step can be done in a number of ways depending on whether you validate for True or False. I chose to validate for False so my next step looks like this:
if ($A -eq $false)
Now that we’ve set up the If statement, we then need to tell the script what to do if the value that variable $A contains is False. We do this in the following way:
{
New-Item C:\Utils -ItemType directory
dir | Out-File C:\Utils\dir.txt
}
One of the things I like about PowerShell it is smart enough to know that the statements between the Curly Parentheses {} are the then part of our script.
The next step is to tell the script what to do if the value of our variable is True and we do this like this:
else
{
dir | Out-File C:\Utils\dir.txt
}
If you’re thinking that it looks very similar to the command in the “If” section of our script above you’d be correct. Functionally we want our script to do one thing – pipe the output of DIR to a text file. As this is a simple script we end up in the same place regardless of the steps we take to get there. If this was a more complex script we could end up in very different places.
Before we step through to part three, let’s take a look at what our script looks like so far. You should have something that looks like this:
$A = Test-Path C:\Utils
if ($A -eq $false)
{
New-Item C:\Utils -ItemType directory
dir | Out-File C:\Utils\dir.txt
}
else
{
dir | Out-File C:\Utils\dir.txt
}
The script above is now perfectly functional. If you run the script above though you’ll get the DIR output of the directory containing the script. It works, but having to copy the script to the directory that you want it to look at won’t always be our best option especially if we want to run this script on multiple directories.
The second to last step in creating our script is to give the DIR command a static path to work with. You can at this point choose whatever path you’d like. You can use the C:\Utils directory that we created above or give it any path you choose.
$A = Test-Path C:\Utils
if ($A -eq $false)
{
New-Item C:\Utils -ItemType directory
dir ‘C:\Utils2\WSUS for Server 2012’| Out-File C:\Utils\dir.txt
}
else
{
dir ‘C:\Utils2\WSUS for Server 2012’| Out-File C:\Utils\dir.txt
}
At this point you could save your script and call it a day, but we aren’t quite done yet. There’s one more good practice that I’d like you to get into – commenting your code.
In a business environment you might not always be the only one who has to work with your code. It’s also not unusual to create a script and then not have to come back to it for weeks, months or even years.
Regardless of how long it will be before you work with your scripts again, commenting your code is a habit that it’s worth the extra time to cultivate. In PowerShell we “comment out” a line by adding a # at the start of it. This tells PowerShell to ignore anything on that line.
My commented code for this exercise looks like this:
## This tutorial script:
## 1. Validates a path and places the result into variable $A.
## 2. Use the variable to determine if it needs to create a path
## 3. It then pipes the output of the DIR command to file.
## Step 1: Create a variable and populate it with the result of the Test-Path Cmdlet
$A = Test-Path C:\Utils
## Step 2a: If $A = False create the directory C:\Utils.
if ($A -eq $false)
{
New-Item C:\Utils -ItemType directory
## Step 2b: Pipe the output of the DIR command to file.
dir ‘C:\Utils2\WSUS for Server 2012’| Out-File C:\Utils\dir.txt
}
## Step 3: If $A = True, pipe the output of the DIR command to file.
else
{
dir ‘C:\Utils2\WSUS for Server 2012’| Out-File C:\Utils\dir.txt
}
Commenting your code is not an exact science. You certainly don’t have to comment it to the level that I’ve done it above. For a short script the explanation at the top would usually suffice. If you’re writing a longer script or a complex script it could be worthwhile breaking down the sections and what everything does. The moral of this story is the better your comments, the less time you spend late on wondering “what the heck this section does”.
Congratulations. It’s been a quite a long slog, but we got there in the end. You should by now understand the basics of writing a PowerShell script. It’s time to turn you loose and have you develop your own script. Remember – the PowerShell ISE and Google are your best allies in learning what you can and cannot do with a CMDlet.
Outcomes
Today we learned:
- What a .ps1 file is all about.
- How the PowerShell ISE can assist in building scripts.
- How to use a Variable and the If/Then/Else command to write a simple script.
- The value of commenting our code
- Intro to PowerShell 3 – The PowerShell ISE - December 11, 2014
- Intro to PowerShell 2 – Cmdlets - December 11, 2014
- Intro to PowerShell 1 – The PowerShell CLI - December 11, 2014
- BigPanda cuts the chatter - November 20, 2014
- Stratusphere FIT and UX solutions hit 5.7 - November 10, 2014
- Review: ioSafe 1513+ - November 6, 2014
- Quaddra provides Storage Insight - November 5, 2014
- Unsatisfactory Responses - July 15, 2014
- Disabling the Windows Update Framework - April 8, 2014
- Behind The Servers S1E1 - March 27, 2014